
Section 2 - Installing Posts
Before starting, confirm the fence design, post sizes, required footings or anchors, and any applicable pool posts with earthing requirements. These are general instructions, not a substitute for project-specific compliance or engineering advice.
2.1 Installing Posts into the Ground
Tools and materials: Tape measure, string line, pegs, spirit level, digging tools, suitable concrete mix (see note) and water.
Recommended Post Footing Sizes
Table 1 – Standard Fence Posts
Note: all dimensions are in millimetres (mm)
Fence height | Post length | Hole diameter | Hole depth |
900 | 1500 | 250 - 300 | 600 |
1200 | 1800 | 250 - 300 | 600 |
1500 | 2100 | 250 - 300 | 600 |
1800 | 2400 | 250 - 300 | 600 |
Table 2 – Gate Posts (For Swing Gates Up to 1189mm Wide)**
Note: all dimensions are in millimetres (mm)
Gate height | Post length | Suitable Profiles | Hole diameter | Hole depth |
900 | 1500 | 50 x 100 100 x 100 | 300 | 600 |
1200 | 1800 | 50 x 100 100 x 100 | 300 | 600 |
1500 | 2100 | 50 x 100 100 x 100 | 300 | 600 |
1800 | 2400 | 50 x 100 100 x 100 | 300 | 600 |
Table 3 – Gate Posts (For Swing Gates 1190 - 1500mm Wide)
Note: all dimensions are in millimetres (mm)
Gate height | Post length | Suitable Profiles | Hole diameter | Hole depth |
900 | 1500 | 100 x 100 x 3mm | 350 | 600 |
1200 | 1800 | 100 x 100x 3mm | 350 | 600 |
1500 | 2100 | 100 x 100 x 3mm | 350 | 700 |
1800 | 2400 | 100 x 100 x 3mm | 350 | 700 |
Table 4 – Gate Posts (For Swing Gates 1501 - 2300mm Wide)
Note: all dimensions are in millimetres (mm)
Gate height | Post length | Suitable Profiles | Hole diameter | Hole depth |
900 | 1500 | 100 x 100 x 3mm | 350 | 700 |
1200 | 1800 | 100 x 100 x 3mm | 350 | 700 |
1500 | 2400 | 100 x 100 x 6mm | 350 | 900 |
1800 | 2700 | 100 x 100 x 6mm | 350 | 900 |
Important: Larger or deeper footings may be required depending on ground/soil conditions. If you are a problematic soil zone, you should seek independent engineering advice.
Installation Steps
Mark out your fence line. Identify the positions of end posts, corner posts, gate posts and intermediate posts. Check the required spacing against your fence panel widths.
Set up a string line. Run a taut string line along the intended front face of the posts, preferably close to ground level.
Dig your post holes. Use the appropriate hole dimensions from the tables above, unless your project requires different footing specifications.
Position your posts. Align the front face of each post with the string line without pushing the line out of position.
Check post alignment. Use a spirit level to ensure each post is plumb in both directions. Check the finished height and spacing before concreting.
Concrete posts into position. Brace posts where necessary and place the suitable concrete mix in accordance with the manufacturer’s instructions.
Complete final checks. Recheck post heights, spacing, alignment and plumb before the concrete begins to set.
Allow the concrete to cure. Follow the concrete manufacturer’s curing instructions before attaching panels or gates. Larger or heavier gates may require additional curing time.
Important: Do not use rapid-set concrete, as it can contain additives that may react with aluminium and cause damage to the post’s finish.
Helpful tip: Installing and aligning your end posts first makes it easier to position all intermediate posts accurately.
2.2 Fixing Posts to Brick, Concrete & Rendered Walls
Tools and materials: Tape measure, spirit level, drill/driver, pilot drill bit, step/cone drill bit, suitable masonry/SDS drill, 10 mm universal nylon masonry plugs, compatible 14G × 75 mm galvanised Type 17 hex-head screws, 25 mm hole caps and masking tape.

Preferred reference supplier: Scrooz (scrooz.com.au). Use compatible products of the specified grade and size; do not substitute fixings solely on appearance.
Recommended Number of Fixings
Post height | Number of fixings |
900 mm | 2 |
1200 mm | 3 |
1500 mm | 3 |
1800 mm | 4 |
Installation Steps
1. Prepare the post. Cut the post to the required finished height. Refer to the aluminium cutting instructions in Section 3.
2. Position the post. Hold it against the wall, check that it is plumb and mark its top and bottom positions.
3. Mark fixing locations. Select sound fixing points, preferably near the centre of suitable bricks. Avoid mortar joints, brick edges and damaged masonry.
4. Drill the post. Mark and drill pilot holes through the front and rear faces of the aluminium post. Apply masking tape to protect the powder coating.
5. Create access holes. Use a step/cone drill to enlarge the front holes to suit the 25 mm access-hole caps. Enlarge the rear holes to provide the required clearance for the selected fixings.
6. Mark the wall. Return the post to its marked position and transfer the fixing locations to the wall. Through-hole marking spray can make this easier.
7. Drill the masonry. Remove the post, drill the wall to the specified diameter and depth, and clean the holes as required by the fixing manufacturer.
8. Secure the post. Insert the approved masonry plugs, position the post and install the compatible screws.
9. Finish the installation. Check the post is plumb and fit the 25 mm access-hole caps.
Important: Fix only into sound, suitable masonry or structural concrete. Render alone is not a suitable fixing substrate. Confirm plug and screw compatibility, adequate embedment and minimum edge distances before drilling.
Helpful tip: Masking tape helps protect the powder-coated finish from aluminium shavings when drilling the access holes.
2.3 Fixing Base-Plated Posts to Concrete Slabs
Tools and materials: Tape measure, spirit level, string line, masonry/SDS drill, suitable drill bits and approved concrete anchors.
Depending on the application, suitable fixings may include concrete screw bolts (M8 X 90), approved expansion anchors (M8 X 80) or chemical anchors with threaded rods.

Installation Steps
1. Mark the positions of the two outside posts and confirm the fence layout.
2. Position the outside posts and mark their base-plate fixing holes.
3. Remove the posts and drill the concrete to the diameter and depth required by the selected anchors.
4. Clean the drilled holes and install the anchors in accordance with the manufacturer’s instructions.
5. Secure the outside posts and check that both are plumb.
6. Run a taut string line between the outside posts, along their front faces and close to the base.
7. Position the intermediate posts against the string line. Check spacing, alignment and plumb before marking the remaining holes.
8. Drill, clean and install the remaining anchors, then secure the posts.
9. Complete a final check of post alignment, spacing, level and plumb before installing panels.
Using Chemical Anchors
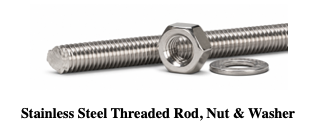
• Drill holes to the required diameter and depth.
• Thoroughly clean the holes using the method specified by the adhesive manufacturer.
• Prepare and dispense the adhesive as directed.
• Insert the threaded rods to the required embedment depth.
• Allow the adhesive to fully cure before tightening or loading the fixings.
Always follow the instructions supplied with the selected chemical anchor system.
Helpful tip: When installing threaded rods with chemical anchors, leave a nut threaded onto the rod to prevent it from being pushed too far into the hole. Position the nut to maintain the required embedment depth.
2.4 Installing Base-Plated Posts onto Tiles
Tools and materials: Diamond tile drill bit or hole saw, drill, SDS drill for the concrete beneath, approved anchors and suitable sealing materials.
Installation Steps
1. Inspect the tiles. Check for cracks, loose tiles or hollow-sounding (drummy) areas before drilling.
2. Mark the post positions. Position the base plates and mark the required fixing locations.
3. Drill through the tiles. Use a suitable diamond bit without hammer action to create clearance holes through the tiles.
4. Drill the concrete. Once through the tiles, use the appropriate masonry/SDS drill to drill into the structural concrete below.
5. Clean the holes. Remove drilling dust and debris in accordance with the anchor manufacturer’s instructions.
6. Install the anchors. Where specified, install chemically anchored stainless steel threaded rods and allow the adhesive to fully cure.
7. Secure the base plate. Position the post, install the nuts and tighten to the approved fixing specification.
8. Check the post. Confirm it is plumb and securely fixed.
Important: The post must be supported by the structural substrate, not by unsupported tiles. Do not overtighten fixings, as this can crack the tiles.
Helpful tip: Chemical anchors can avoid the expansion forces associated with some mechanical anchors, but overtightening can still damage tiles.
2.5 Fixing Base-Plated Posts to Timber Decking
Tools and materials: Drill/driver, suitable pilot drill bit, approved structural timber blocking and compatible structural timber screws.
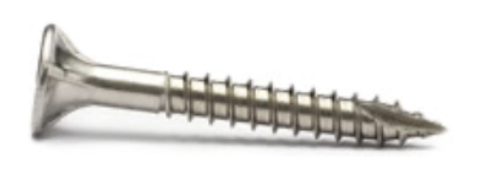
Where suitable for the supporting timber structure, Future Fence recommends 14G × 100 mm Stainless Steel Bugle Batten Screws with a 5 mm internal hex drive.
Installation Steps
Check that the deck and supporting structure are suitable for the proposed fencing and expected loads.
Confirm the post fixings will engage structural timber, such as suitable joists or additional structural blocking.
Position the base plate and mark the fixing locations.
Install additional structural timber blocking beneath the decking where required.
Pre-drill pilot holes to suit the timber and selected screws.
Secure the base plate using the approved fixings and matching driver bit.
Check the post is plumb and securely fixed.
Important: Never rely on decking boards alone to support fence posts. Fixings must be secured into suitable structural timber beneath the deck. Install additional timber block where required.
Future Fence fencing panels and posts are not specified for use as balustrades or fall-protection barriers.
2.6 Installing Posts onto Core-Filled Block Walls
Tools and materials: Base-plated post, drill, approved chemical anchors and threaded rods where specified, hole-cleaning equipment and measuring tools.
For chemical anchor and threaded rod identification, see the images in Section 2.3.
Installation Steps
1. Check the wall. Confirm that the block wall is structurally suitable, adequately reinforced and fully core-filled.
2. Position the post. Check the base-plate dimensions against the wall width and confirm that the fixing locations can achieve the required edge distances.
3. Check fixing requirements. Confirm anchor type, embedment depth, reinforcement locations and minimum edge distances before drilling.
4. Mark and drill. Carefully drill the fixing holes, taking particular care near block edges.
5. Clean the holes. Follow the chemical anchor manufacturer’s specified hole-cleaning procedure.
6. Install the anchors. Insert the approved chemical anchors and threaded rods, then allow the adhesive to fully cure.
7. Secure the post. Fit the base plate and tighten the nuts to the specified torque.
8. Complete final checks. Confirm the post is plumb, correctly aligned and securely fixed. Check the surrounding blockwork for damage.
Important: Do not fix posts to hollow, unfilled or unverified blockwork. Where the wall construction, reinforcement or suitability cannot be confirmed, stop and seek appropriate technical advice before drilling.
Helpful tip: Where specified by the approved fixing design, chemically anchored threaded rods can reduce expansion-related damage near block edges compared with expansion anchors.